


1996 Blazer
- Locate the Data Link Port. It is located under dash drivers side. Be sure you know
which pins are 8 and 4.
(Note port is wider at top) Your OBDII port will not
have numbers, use this diagram for reference.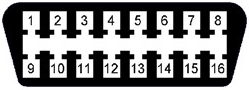
- Make sure there are metal contact pins in terminals 8 and 4. Connect 8 to 4 with a suitable jumper wire (leave the jumper wire connected throughout the programming procedure). Make sure you know which terminals are 8 and 4. The vehicle will respond by locking and unlocking the doors to signify entering of programming mode.
- Press and hold both the LOCK and UNLOCK buttons together on the first transmitter to be programmed. After about 15 seconds, the vehicle will respond by locking and unlocking the doors. Release the buttons on the transmitter.
- Within one minute, repeat the previous step on the remaining transmitters to be programmed.
- Remove jumper wire applied to th OBDII Port.
If the above procedure does not work we have had reports that the following procedure worked on the 1996 Blazer
DATA LINK CONNECTOR
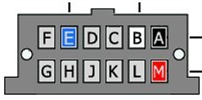
- Locate the Data Link Connector (DLC) underneath the driver's side dashboard. Use the figure as a map for your DL ( They are not lettered on your vehicle.) The view is looking straight into the cavities of the DLC.
- Connect cavity G with cavity A using a fused jumper wire. Your vehicle will respond by locking and unlocking the door locks within 2 seconds.
- Press any button 3 times in successtion on first remote to be programmed. Locks will lock and unlock verifying remote was programmed.
- Press any button 3 times in succession on second remote to be programmed if applicable. Locks will lock and unlock to verify remote was programmed.
- Remove jumper wire and test remote(s)